
Cannabis Seed Germination Guide: From Dormant Seed to Healthy Seedling
Getting cannabis off to a strong start begins long before the first leaves appear. A clear, reliable cannabis seed germination guide helps you turn dormant seeds into vigorous seedlings with fewer losses, less guessing, and better long term yields.
Cannabis Seed Germination Guide: Key Principles
Germination is the process where a seed absorbs water, activates internal enzymes, cracks its shell, and sends out the first root (taproot). While different methods exist, all successful approaches respect four core conditions:
- Moisture: Constant, gentle moisture is essential; avoid both dryness and soaking.
- Warmth: Aim for 21 to 26 degrees Celsius (70 to 79 Fahrenheit) for optimal enzyme activity.
- Oxygen: Seeds need air; stagnant, waterlogged environments quickly cause rot.
- Darkness or low light: Seeds naturally sprout underground, so bright light is unnecessary at this stage.
When these basics are in balance, most viable cannabis seeds will crack and show a taproot within 24 to 96 hours.
Choosing and Storing Cannabis Seeds
Healthy seeds are the foundation of any germination strategy. Poor genetics or old, badly stored seeds will dramatically reduce success rates.
What Healthy Cannabis Seeds Look Like
- Firm to the touch, not soft or easily crushed.
- Shell color ranging from light brown to dark brown, often with subtle mottling.
- No visible cracks, mold, or white fuzzy growth.
- Medium size; very tiny or pale green seeds are often immature.
Proper Seed Storage
If you are not germinating right away, store seeds:
- In a cool, dry place, ideally 6 to 10 degrees Celsius (42 to 50 Fahrenheit).
- In an airtight container with a small desiccant pack to control humidity.
- Protected from light and frequent temperature swings.
Good storage can keep seeds viable for several years, though germination rates usually decline slowly over time.
Popular Germination Methods Explained
There is no single best method for every grower. Choose the approach that matches your experience level, tools, and growing style.
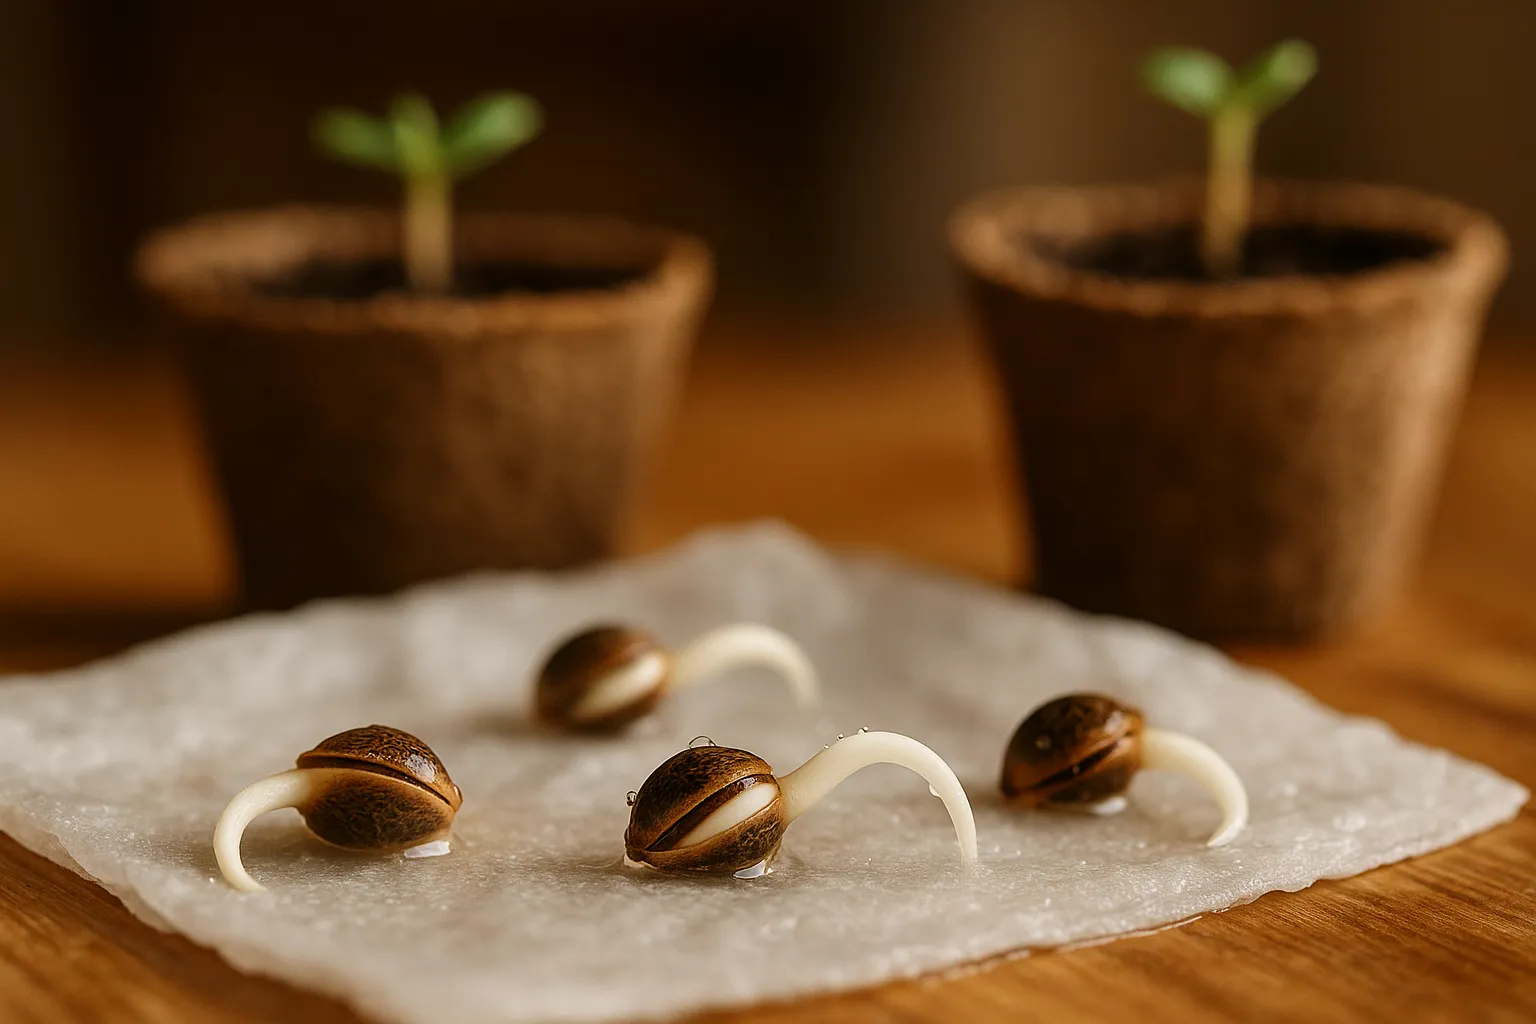
1. Paper Towel Method
This is one of the most common techniques because it is simple and allows you to monitor progress.
- Moisten two plain paper towels with clean, pH balanced water; they should be damp, not dripping.
- Place seeds between the towels and set them on a plate.
- Cover with another plate or place inside a plastic bag with small air holes.
- Keep in a warm, dark place and check once or twice daily.
Pros: Easy to see which seeds have sprouted and how long the taproot is. Cons: Roots are delicate and can be damaged when moved to soil or another medium.
2. Direct to Soil or Growing Medium
Planting directly into a small pot or starter plug reduces transplant shock.
- Fill a small container with light, airy seed starting mix or coco coir.
- Make a hole about 1 to 1.5 centimeters deep (around 0.5 inches).
- Place the seed pointy end down if visible, cover lightly, and mist with water.
- Keep the medium evenly moist and warm until the seedling emerges.
Pros: Minimal handling of the taproot, more natural environment. Cons: You cannot see ungerminated seeds, and overwatering is a common mistake.
3. Water Glass Soak (Pre Soak)
Many growers begin with a short soak to speed up water absorption.
- Fill a glass with room temperature, clean water.
- Drop seeds in and let them soak for 12 to 24 hours, but no longer than 48 hours.
- Once seeds sink or show a tiny crack, transfer them to paper towels or soil.
This method can help older or harder seeds wake up, but extended soaking reduces oxygen and invites rot.
Ideal Conditions During Germination
Fine tuning the environment improves your success rate and uniformity.
- Temperature: Maintain a stable 21 to 26 degrees Celsius. Seedling heat mats can help in cool rooms.
- Humidity: Moderate to high humidity (60 to 80 percent) prevents seeds and young roots from drying out.
- Water quality: Use clean, low mineral water; if using tap water, let it sit 24 hours to allow chlorine to dissipate.
- Handling: Avoid touching the taproot; if you must move a seed, hold it gently by the shell.
Troubleshooting Common Germination Problems
Seeds Not Sprouting
- Seed age or poor storage can reduce viability.
- Temperatures below 18 degrees Celsius slow or stop germination.
- Seeds that dry out after initial soaking often fail to continue developing.
Mold or Rot
- Excess water and poor air exchange are the main causes.
- Use only lightly damp materials and avoid sealed, airless containers.
- Remove obviously moldy seeds to protect the rest.
Weak or Stretched Seedlings
- Once seedlings emerge, they need gentle but sufficient light to stay compact.
- Place them under a low intensity grow light or near a bright window, adjusting distance to prevent burning.
- Ensure they are not overwatered; soggy soil weakens young stems.
From Germination to Early Growth
When the seed shell falls off and the first two rounded leaves (cotyledons) open, the plant shifts from relying on stored energy to photosynthesis.
- Transplant gently into slightly larger containers once roots begin to fill the starter cell or plug.
- Use a mild, balanced nutrient solution or light soil mix; strong fertilizers can burn young roots.
- Maintain stable environmental conditions as the plant transitions into the vegetative stage.
Conclusion
A structured cannabis seed germination guide helps you avoid guesswork and common mistakes during the most delicate phase of the plant life cycle. By choosing healthy seeds, providing consistent warmth and moisture, selecting the right germination method for your setup, and responding quickly to issues like mold or stretching, you give every seed the best chance to become a vigorous, productive plant.
